Azure Integration
Azure Integration
To enable the Azure Integration, SAML must be enabled for your Firm's environment, with a subscription to the integration. Please contact sales@clockworkrecruiting.com to have that enabled.
Your users won't have access if their Azure SSO email is different from their CW email. In order to ensure accuracy here, download the users table in firm settings and compare it to your users table in your SSO provider. If there are differences, follow these steps BEFORE you send your Metadata URL.
Once the request has been sent, your emails are matching, and the subscription has been fulfilled, retrieve your Metadata URL and share it with support@clockworkrecruiting.com. The integration will be created on our end and turned on for your firm the following workday.
Features Supported
- SP-initiated SSO
Adding Clockwork to your Azure Account
- Sign in to the Azure portal using either a work or school account, or a personal Microsoft account.
- On the left navigation pane, select the Azure Active Directory service.
- Navigate to Enterprise Applications and then select All Applications.
- To add new application, select New application.
- In the Add from the gallery section, type Clockwork in the search box.
- Select Clockwork from results panel and then add the app. Wait a few seconds while the app is added to your tenant.
Configure Azure AD SSO
Follow these steps to enable Azure AD SSO in the Azure portal.
- In the Azure portal, on the Clockwork application integration page, find the Manage section and select single sign-on.
- On the Select a single sign-on method page, select SAML.
- On the Set up single sign-on with SAML page, click the edit/pen icon for Basic SAML Configuration to edit the settings.
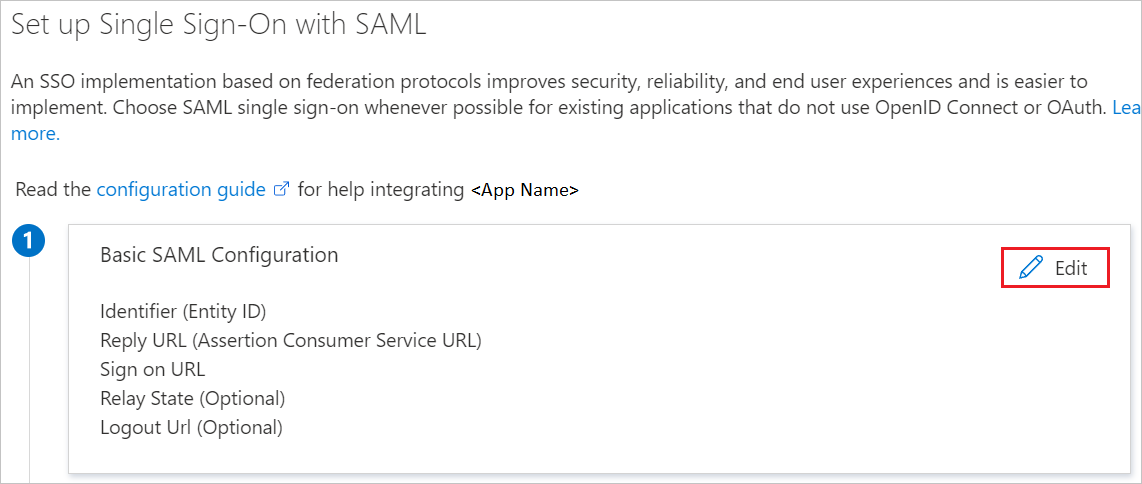
- On the Basic SAML Configuration section, enter the values for the following fields:
- In the Sign on URL text box, type a URL using the following pattern: https://
- b. In the Identifier (Entity ID) text box, type a URL using the following pattern: https:// < subdomain
>.clockworkrecruiting.com/sp - In the Reply URL (Assertion Consumer Service URL) text box, type a URL using the following pattern: https:// < subdomain >.clockworkrecruiting.com/saml/consume
- In the Sign on URL text box, type a URL using the following pattern: https://
- On the Set up single sign-on with SAML page, in the SAML Signing Certificate section, find Federation Metadata URL. Copy the App Federation Metadata URL and send it to Clockwork Support or your setup representative.

Create an Azure AD test user
In this section, you'll create a test user in the Azure portal called B.Simon.
- From the left pane in the Azure portal, select Azure Active Directory, select Users, and then select All users.
- Select New user at the top of the screen.
- In the User properties, follow these steps:
- In the Name field, enter
B.Simon. - In the User name field, enter the username@companydomain.extension. For example,
B.Simon@contoso.com. - Select the Show password check box, and then write down the value that's displayed in the Password box.
- Click Create.
- In the Name field, enter
Assign the Azure AD test user
In this section, you'll enable B.Simon to use Azure single sign-on by granting access to Clockwork.
- In the Azure portal, select Enterprise Applications, and then select All applications.
- In the applications list, select Clockwork.
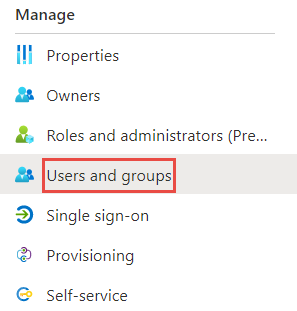
- In the app's overview page, find the Manage section and select Users and groups.
- Select Add user, then select Users and groups in the Add Assignment dialog.

- In the Users and groups dialog, select B.Simon from the Users list, then click the Select button at the bottom of the screen.
- If you're expecting any role value in the SAML assertion, in the Select Role dialog, select the appropriate role for the user from the list and then click the Select button at the bottom of the screen.
- In the Add Assignment dialog, click the Assign button.
SignIn Process
Once Azure is activated, Firm Users will no longer be able to login with their email and password. Client Users will continue to use their email and password to access the Firm environment.
- Use the SignIn with Azure option when visiting the Firm Specific Login page (http://FirmName.ClockworkRecruiting.com/session/new)
